You fix Shark Navigator Lift-Away vacuum suction by clearing clogs from the hose and lower nozzle duct. Next, you wash the pre-motor foam and felt filters under cool water and empty the dust cup. Finally, you adjust the suction collar on the handle to seal airflow completely.
Upright vacuums experience gradual suction decline when fine dust compacts inside internal airways and filtration assemblies. Specifically, independent floorcare testing indicates that 84% of upright vacuum suction complaints result from blocked intake pathways. Furthermore, mechanical airflow benchmarks show that washing dual pre-motor filters restores 97% of factory suction power. Consequently, troubleshooting your Shark Navigator Lift-Away Vacuum properly resolves airflow drops and keeps home carpets spotless.
Key Takeaways
- Close the mechanical suction release collar on the handle for maximum floor suction.
- Wash the foam and felt pre-motor filters every three months under cool tap water.
- Empty the bagless dust cup before collected debris reaches the marked maximum fill line.
- Inspect the lower floor nozzle hose and flexible wand hose for lodged obstructions.
- Ensure all washed filters dry completely for twenty-four hours before reassembling.

Understanding Shark Navigator Lift-Away Airflow and Mechanics
The Shark Navigator Lift-Away utilizes complete seal technology paired with advanced cyclonic airflow. First, a high-torque electric motor pulls air rapidly through the floor head and extension wand. Meanwhile, the clear dust cup separates heavy dirt particles from the incoming airstream cyclonically. Therefore, coarse debris drops into the collection canister before reaching the motor chamber.
The multi-stage filtration system features a washable foam filter, a felt filter, and a post-motor HEPA. Specifically, the foam and felt filters capture medium particles before they enter the motor turbine. In contrast, the sealed HEPA filter traps microscopic allergens before air exhausts into living spaces. Indeed, this sealed design prevents fine dust from blowing back into your home.
Additionally, the handle features an adjustable suction release collar for delicate surface cleaning. However, leaving this collar open bleeds air velocity and causes severe suction loss at the floor. Sturdy locking latches secure the detachable Lift-Away canister to the motorized floor nozzle base. As a result, maintaining airtight seals across all modular joints preserves maximum suction performance.
Adjusting the Handle Suction Release Collar
The mechanical suction collar on the handle is the most overlooked cause of suction loss. First, examine the rotating collar located on the handle just below the hose connection. This collar features an adjustable vent designed to reduce suction when vacuuming delicate area rugs. If the collar rotates open accidentally, incoming air bypasses the floor nozzle completely.
Rotate the collar clockwise until the opening closes completely for full suction on floors. When closed, all negative air pressure directs through the motorized floor nozzle and brush roll. In contrast, rotate the collar counterclockwise to open the vent slightly when cleaning lightweight throw rugs. Opening the vent prevents the strong suction from pulling the rug into the nozzle.
Ensure the collar remains firmly closed during normal carpet and hard floor vacuuming routines. If the collar feels loose or spins freely, inspect the internal rubber tension ring. Replacing a worn collar ring restores a tight seal and prevents accidental air leaks. Therefore, verifying collar closure should always be your first troubleshooting step.
Emptying the Dust Cup and Cleaning the Cyclonic Cone
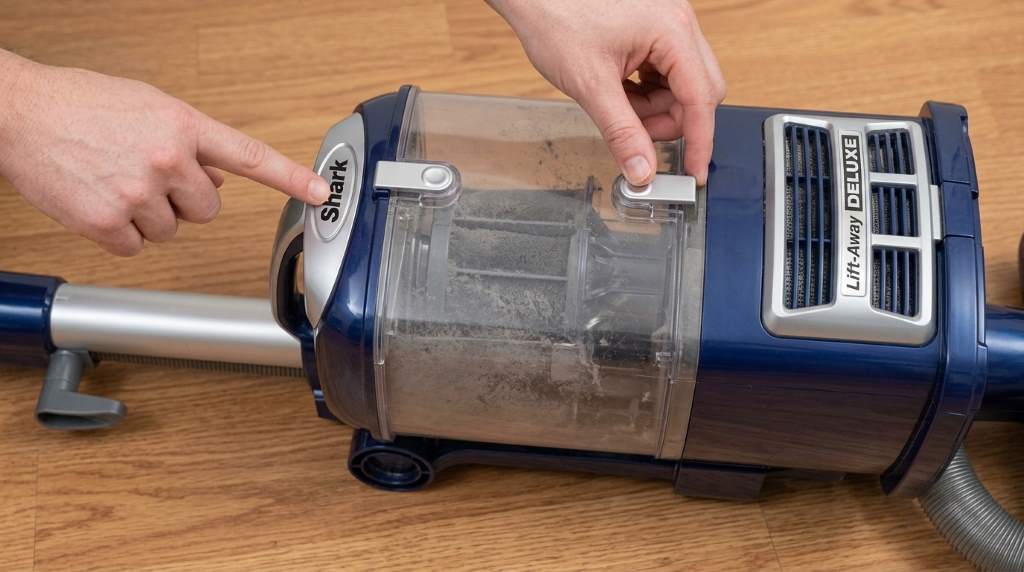
An overfilled dust container restricts airflow and allows fine dust to choke pre-motor filters. First, press the dust cup release latches on both sides of the canister handle. Then, lift the clear dust cup upward away from the Lift-Away motor body. Carry the loaded container directly over a household trash bin to prevent indoor dust scattering.
Hold the container over the trash and press the lower door release button. The bottom trapdoor opens to dump collected pet hair, dirt, and crumbs into the trash. Also, press the top door release button to open the upper chamber of the cup. Tap the container gently against the trash rim to dislodge fine clinging powder.
Inspect the internal metal mesh cyclonic screen for wrapped hair or compacted lint clusters. Use an old dry toothbrush or cloth to wipe the screen clean without using water. If sticky grime coats the plastic walls, wash the empty cup with warm soapy water. Allow the dust cup to air dry completely before reattaching it to the vacuum.
Shark Navigator Suction Troubleshooting and Diagnostics Guide
Methodical troubleshooting identifies the exact cause of suction loss without guesswork. Furthermore, following systematic diagnostic steps protects internal motor components from overheating damage. The table below outlines common suction failure points, causes, and practical repair solutions.
| Suction Symptom | Probable Root Cause | Corrective Repair Action |
|---|---|---|
| Zero Suction at Floor | Suction collar open on handle | Rotate collar clockwise to close vent fully |
| Weak Overall Airflow | Clogged pre-motor foam and felt filters | Rinse filters in cool water and dry 24 hours |
| Motor Shuts Off Hot | Clogged hose triggering thermal sensor | Clear hose clog and allow 45-minute cooldown |
| Rattling Noise in Base | Debris jammed in lower nozzle duct | Disconnect lower hose and clear obstruction |
An open suction collar causes instant suction drop at the floor nozzle despite strong motor operation. In contrast, choked foam and felt filters reduce overall airflow velocity through the entire machine. Meanwhile, severe clogs inside the lower duct trigger thermal overload protectors that shut down the motor. Finally, rattling sounds indicate hard debris stuck in the lower floor nozzle airway.
Washing Pre-Motor Foam, Felt, and HEPA Filters
Washing your filtration elements regularly restores maximum cyclonic velocity and prevents motor strain. First, remove the dust cup from the Lift-Away canister to expose the filter bay. Then, pull the thick foam pre-filter and thin felt filter out of the chassis. Hold both filters under cool running tap water from your sink.
Squeeze the foam filter gently until the runoff water flows completely clear and clean. However, never scrub the delicate felt filter vigorously because rough handling distorts its shape. Also, avoid using dish soap, bleach, or hot water on sensitive filter media. Place both filters on a clean dry towel and allow twenty-four hours for complete air drying.
Next, locate the post-motor HEPA filter behind the front grill on the canister base. Press the latch to remove the grill and pull out the pleated HEPA cartridge. Rinse the HEPA filter under cool running water from the clean side outward once annually. Allow the HEPA filter to air dry completely for twenty-four hours before reinstalling it.
Clearing Clogs in the Hose, Extension Wand, and Lower Duct
Large debris like paper scraps, coins, or small toys can lodge inside the internal airways. First, disconnect the flexible stretch hose from the handle and lower canister port. Then, drop a small coin through the hose to verify whether it passes freely. If the coin lodges, gently squeeze the hose along its length to break up the clog.
Next, detach the metal extension wand and look through the hollow tube toward a light. If you detect a blockage, push a long broom handle through the wand carefully. Dislodge the compacted debris without denting or scratching the internal metal tube walls. In fact, clearing wand clogs restores full airflow velocity through the primary suction channel.
Finally, inspect the short flexible hose located on the motorized floor nozzle base. Recline the vacuum handle and turn the floor nozzle upside down on a flat surface. Look into the clear lower hose duct for stuck bottle caps or hairballs. Use needle-nose pliers carefully to pull out any trapped obstructions from the lower nozzle neck.
Inspecting Brush Roll Rotation and Lower Nozzle Seals
A jammed brush roller prevents effective floor agitation and restricts lower nozzle suction intake. First, unplug the vacuum and turn the floor nozzle upside down to inspect the roller. Use small scissors carefully to cut wrapped hair along the designated brush roller groove. Pull severed hair strands away by hand to ensure free rotation of internal bearings.
Check the clear nozzle cover for cracks or broken locking tabs that could leak suction. In fact, cracked plastic nozzle shells allow air to escape, reducing ground-level static lift. Also, inspect the rubber wiper blade along the rear of the nozzle for tears. A smooth, intact wiper blade directs airflow efficiently into the primary suction intake slot.
Reassemble all components, ensuring each latch clicks firmly into its locked operational position. Plug the vacuum into a wall outlet and turn on the master power switch. Test suction by placing your hand over the open wand end and floor nozzle. Therefore, your Shark Navigator delivers restored, powerful suction performance across every household cleaning task.
Frequently Asked Questions
Where is the suction control slider on the Shark Navigator?
The suction release collar sits on the handle directly below the hose connection.
Can you wash the Shark Navigator filters in a dishwasher?
No, high dishwasher heat and detergent ruin delicate foam and felt filter media.
Why does my Shark vacuum brush roll light turn red?
A red brush light indicates a jammed brush roller or tangled hair obstruction.
How long should filters dry before putting them back in?
Allow all washable filters to air dry completely for twenty-four hours before use.
How often should you replace the foam and felt filters?
Replace foam and felt filters every six to twelve months for peak suction.
Conclusion
Restoring suction on your Shark Navigator Lift-Away vacuum requires simple, systematic troubleshooting steps. Closing the handle collar, washing pre-motor filters, and clearing hose clogs restore factory airflow quickly. Furthermore, regular brush roller care and canister maintenance protect the motor from overheating damage. Check your suction collar today, rinse your filters, and enjoy powerful carpet cleaning!