I still remember the first time my dryer started taking forever to dry a single load of laundry. The clothes came out damp, and the machine was hot to the touch. That’s when I realized my dryer vent was clogged with lint, dust, and debris. It wasn’t just an inconvenience—it was a serious fire hazard. According to the U.S. Fire Administration, clogged dryer vents cause nearly 2,900 home fires each year, resulting in millions of dollars in damage and even loss of life. That’s when I decided to take action. Cleaning my dryer vent wasn’t just about improving efficiency; it was about ensuring the safety of my home and family.
If you’ve noticed your dryer taking longer than usual to dry clothes or if it feels unusually hot, it might be time to clean your vent. Understanding the essentials of dryer vent cleaning can help you maintain better airflow, improve efficiency, and reduce the risk of fire. With the right tools and techniques, you can keep your dryer running smoothly and safely for years to come.
Why Cleaning Dryer Vents Is Essential for Safety and Efficiency
Cleaning your dryer vent is one of the most important maintenance tasks for your home. Over time, lint, dust, and debris can build up in the vent, restricting airflow and causing your dryer to work harder and less efficiently. According to the National Fire Protection Association (NFPA), failure to clean dryer vents is the leading cause of dryer-related fires in residential homes. These fires can spread quickly, causing significant damage and putting your family at risk.
Additionally, a clogged dryer vent can lead to higher energy bills and unnecessary wear and tear on your machine. When airflow is restricted, your dryer has to run longer to dry clothes, consuming more electricity and increasing the risk of overheating. For homeowners, this means higher utility costs and a shorter lifespan for your appliance. Regularly cleaning your dryer vent can help you avoid these issues and keep your machine running at peak performance.
For those who use their dryer frequently, cleaning the vent is also a matter of convenience. A clogged vent can lead to longer drying times, damp clothes, and even a musty odor in your laundry room. By maintaining a clean vent, you can ensure your dryer works efficiently, saving you time, money, and frustration in the long run.
Key Tools for Cleaning Dryer Vents with Vacuum Attachments
To clean your dryer vent safely and effectively, you’ll need the right tools. While there are specialized dryer vent cleaning kits available, many household vacuum cleaners come with attachments that can get the job done. Here are some of the most useful tools to consider:
1. Crevice Tool
A crevice tool is a narrow, elongated attachment designed to reach into tight spaces, such as the narrow opening of a dryer vent. It’s perfect for removing lint and debris from the vent’s entrance, where buildup is often the most severe. The crevice tool can also be used to clean around the dryer’s lint trap and other hard-to-reach areas.
Additionally, the crevice tool is often included with most vacuum cleaners, making it a convenient and accessible option for regular maintenance. Its slim design allows you to maneuver it easily into the vent, ensuring you can remove as much lint as possible.
2. Hose Attachment
A hose attachment is a flexible, extendable tool that can reach deeper into the dryer vent to remove lint and debris. It’s especially useful for vents that are long or have bends, where a crevice tool might not reach. The hose attachment can also be used to clean the vent from the outside of your home, where lint can accumulate and cause blockages.
Additionally, some hose attachments come with a brush or nozzle at the end, which can help loosen stubborn lint and improve the vacuum’s suction. This can make the cleaning process more thorough and effective.
3. Brush Attachment
A brush attachment is a soft-bristled tool designed to agitate and loosen lint and debris from the walls of the dryer vent. It’s especially useful for vents that have a significant buildup of lint, as the brush can help break it up and make it easier for the vacuum to remove. The brush attachment can also be used to clean the lint trap and other components of your dryer.
Additionally, consider the size and shape of the brush attachment. A smaller, more flexible brush may be better for cleaning tight or curved spaces, while a larger, stiffer brush may be more suitable for loosening stubborn lint in straight vents.
4. Upholstery Tool
An upholstery tool is a wide, flat attachment designed for cleaning larger surfaces, such as furniture or carpets. While it may not be the first tool you think of for cleaning a dryer vent, it can be useful for removing lint and debris from the vent’s exterior or the area around the dryer. The upholstery tool can also help clean the lint trap and other accessible parts of the machine.
Additionally, the upholstery tool’s wide surface area can help cover more ground quickly, making it a good option for cleaning larger or more open areas around your dryer.
5. Dryer Vent Cleaning Kit
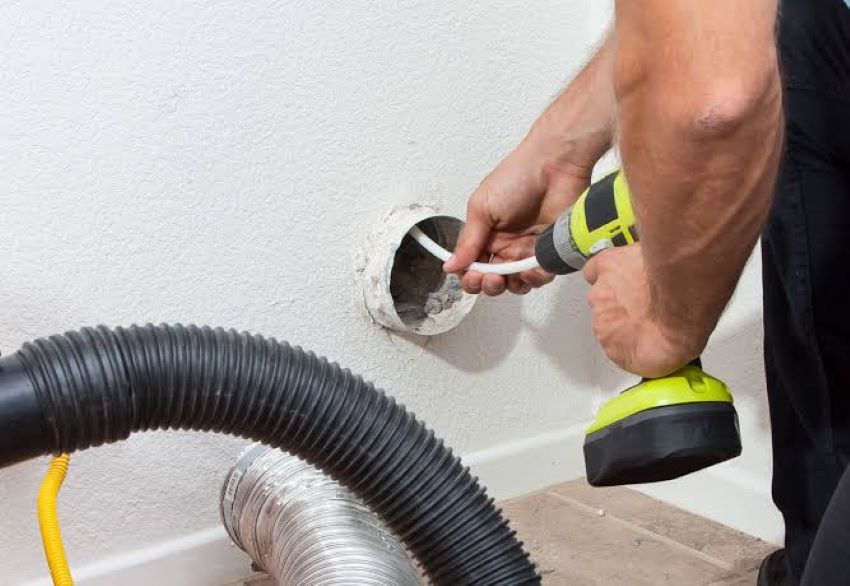
If your vacuum cleaner doesn’t come with the right attachments for cleaning your dryer vent, consider investing in a specialized dryer vent cleaning kit. These kits typically include a long, flexible brush or rod that can reach deep into the vent, as well as a vacuum attachment for removing the loosened lint and debris. Some kits also come with a drill attachment, allowing you to use a power tool for more thorough cleaning.
Additionally, dryer vent cleaning kits are designed specifically for this task, making them a more effective and efficient option than standard vacuum attachments. They’re a great investment for homeowners who want to ensure their dryer vent is as clean and safe as possible.
How to Clean Your Dryer Vent Using Vacuum Attachments
Cleaning your dryer vent with vacuum attachments is a straightforward process, but it’s important to follow the right steps to ensure safety and effectiveness. Here’s a step-by-step guide to help you get the job done:
1. Unplug the Dryer
Before you begin, unplug your dryer from the power outlet to prevent any accidents or injuries. If your dryer is hardwired, turn off the circuit breaker that powers it. This step is crucial for your safety, as it ensures the machine won’t turn on while you’re cleaning the vent.
Additionally, if you’re cleaning a gas dryer, make sure to turn off the gas supply to prevent any leaks or hazards. Safety should always be your top priority when working with appliances.
2. Locate the Dryer Vent
Locate the dryer vent on the back of your machine. It’s usually a large, flexible hose that connects the dryer to the vent duct leading outside. If you’re unsure where it is, consult your dryer’s manual or look for a hose clamped to the back of the appliance. The vent may also have a removable cover or flap on the exterior of your home.
Additionally, check the vent’s path to ensure you can access it with your vacuum attachments. If the vent has bends or turns, you may need a flexible hose or brush attachment to reach all the way through.
3. Remove the Vent Hose
Carefully disconnect the vent hose from the back of the dryer and from the wall or exterior vent. You may need to loosen a clamp or screw to release the hose. Once it’s disconnected, pull the hose away from the dryer and inspect it for lint buildup. If the hose is flexible, you can use your vacuum attachments to clean it from both ends.
Additionally, if the hose is heavily clogged, you may need to replace it entirely. Flexible vent hoses are inexpensive and easy to find at hardware stores or online retailers.
4. Vacuum the Vent and Hose
Using your vacuum cleaner and the appropriate attachments, vacuum the lint and debris from the vent hose and the dryer’s vent opening. Start with the crevice tool to reach into the narrow spaces, then use the hose or brush attachment to clean deeper into the vent. Work from both ends of the hose to ensure you remove as much lint as possible.
Additionally, pay special attention to the area where the hose connects to the dryer and the wall. These are common spots for lint to accumulate and cause blockages. Use the brush attachment to agitate the lint and make it easier for the vacuum to remove.
5. Clean the Exterior Vent
Don’t forget to clean the exterior vent, where lint can also build up and restrict airflow. Use your vacuum attachments to remove lint and debris from the vent cover or flap. If the vent has a removable cover, take it off and clean it separately with a brush or cloth.
Additionally, check the area around the exterior vent for any obstructions, such as leaves, dirt, or animal nests. These can also restrict airflow and pose a fire hazard, so it’s important to keep the area clear.
6. Reconnect and Test
Once you’ve finished cleaning, reconnect the vent hose to the dryer and the wall or exterior vent. Make sure all clamps or screws are secure and the hose is properly aligned. Plug the dryer back in or turn the circuit breaker back on, then run a test cycle to ensure everything is working properly.
Additionally, monitor your dryer’s performance after cleaning. If you notice that clothes are still taking longer to dry or the machine feels hot to the touch, there may still be a blockage or issue that needs to be addressed.
Common Mistakes to Avoid When Cleaning Dryer Vents
Even with the best intentions, it’s easy to make mistakes when cleaning your dryer vent. Here are some common pitfalls to avoid:
1. Skipping the Unplugging Step
Failing to unplug your dryer before cleaning can lead to serious accidents or injuries. Avoid starting the cleaning process without first disconnecting the power supply. This ensures the machine won’t turn on while you’re working on it, reducing the risk of electric shock or other hazards.
Additionally, if you’re cleaning a gas dryer, always turn off the gas supply to prevent leaks or other dangers. Safety should always come first when working with appliances.
2. Not Cleaning the Entire Vent System
Cleaning only the visible parts of the dryer vent, such as the lint trap or the exterior vent, can leave lint and debris buildup in the hidden areas of the system. Avoid neglecting the entire vent path, from the dryer’s lint trap to the exterior vent. Use your vacuum attachments to reach as far into the vent as possible, ensuring a thorough cleaning.
Additionally, consider using a dryer vent cleaning kit for more comprehensive results. These kits are designed to reach deep into the vent and remove stubborn lint and debris.
3. Using the Wrong Attachments
Using the wrong vacuum attachments can make the cleaning process less effective or even cause damage to your dryer vent. Avoid using attachments that are too large or rigid for the vent’s opening, as this can push lint further into the system or scratch the vent’s walls. Instead, opt for narrow, flexible attachments like the crevice tool or hose attachment.
Additionally, consider the material of the vent when choosing attachments. Some vents may be more delicate or prone to damage than others, so always use gentle, controlled motions when cleaning.
4. Forgetting to Clean the Lint Trap
The lint trap is a critical component of your dryer’s vent system, and neglecting to clean it can lead to reduced airflow and efficiency. Avoid skipping the lint trap when cleaning your dryer vent. Remove the trap, clean it with a brush or vacuum attachment, and rinse it with water if necessary. Allow it to dry completely before reinserting it into the dryer.
Additionally, make it a habit to clean the lint trap after every load of laundry. This simple step can help prevent lint buildup and improve your dryer’s performance.
5. Ignoring the Exterior Vent
The exterior vent is just as important as the interior components of your dryer’s vent system. Avoid neglecting to clean the exterior vent, where lint and debris can accumulate and restrict airflow. Use your vacuum attachments to remove lint from the vent cover or flap, and check the area around the vent for any obstructions.
Additionally, consider installing a vent cover or guard to prevent leaves, dirt, or animals from entering the vent and causing blockages. This can help maintain better airflow and reduce the need for frequent cleaning.
Tips for Maintaining a Clean Dryer Vent
To keep your dryer vent clean and functioning at its best, follow these tips for regular maintenance and care:
1. Clean the Lint Trap After Every Load
One of the simplest and most effective ways to maintain a clean dryer vent is to clean the lint trap after every load of laundry. This prevents lint from building up in the trap and vent system, reducing the risk of clogs and improving your dryer’s efficiency. Simply remove the trap, peel off the lint, and rinse it with water if necessary. Allow it to dry completely before reinserting it into the dryer.
Additionally, consider using a lint trap brush or vacuum attachment to remove any residual lint from the trap’s housing. This can help ensure the trap is as clean as possible and functioning at peak performance.
2. Inspect the Vent System Regularly
Regularly inspect your dryer’s vent system for signs of lint buildup, blockages, or damage. Check the vent hose, the connection points, and the exterior vent for any obstructions or wear and tear. If you notice any issues, address them promptly to prevent further buildup or hazards.
Additionally, consider using a dryer vent inspection tool or camera to check for blockages deep within the vent. This can help you identify and address issues before they become more serious.
3. Use a Dryer Vent Cleaning Kit
For a more thorough and effective cleaning, consider investing in a dryer vent cleaning kit. These kits typically include a long, flexible brush or rod that can reach deep into the vent, as well as a vacuum attachment for removing loosened lint and debris. Some kits also come with a drill attachment, allowing you to use a power tool for more comprehensive cleaning.
Additionally, dryer vent cleaning kits are designed specifically for this task, making them a more effective and efficient option than standard vacuum attachments. They’re a great investment for homeowners who want to ensure their dryer vent is as clean and safe as possible.
4. Replace Damaged or Worn Vent Hoses
If your dryer’s vent hose is damaged, worn, or heavily clogged, it may be time to replace it. Flexible vent hoses are inexpensive and easy to find at hardware stores or online retailers. Replacing a damaged hose can improve airflow, reduce the risk of fire, and extend the life of your dryer.
Additionally, consider upgrading to a more durable or fire-resistant vent hose, such as a metal or semi-rigid aluminum hose. These hoses are less prone to kinking, crushing, or catching lint, making them a safer and more long-lasting option.
5. Schedule Professional Cleaning
While regular cleaning with vacuum attachments can help maintain your dryer vent, it’s also a good idea to schedule professional cleaning at least once a year. Professional dryer vent cleaning services have the tools, expertise, and experience to thoroughly clean your vent system, ensuring it’s free of lint, debris, and other obstructions.
Additionally, professional cleaning can help identify and address any underlying issues with your dryer vent, such as damage, wear and tear, or improper installation. This can help you avoid potential hazards and keep your dryer running safely and efficiently.
The Benefits of Cleaning Your Dryer Vent
Cleaning your dryer vent offers a variety of benefits that can improve the safety, efficiency, and longevity of your appliance. Here are some of the most notable advantages:
1. Reduces the Risk of Fire
One of the most important benefits of cleaning your dryer vent is reducing the risk of fire. Lint is highly flammable, and a clogged vent can cause heat to build up in the dryer, increasing the risk of ignition. According to the NFPA, nearly 2,900 dryer fires are reported each year, causing millions of dollars in damage and even loss of life. Regularly cleaning your dryer vent can help prevent these fires and keep your home and family safe.
Additionally, a clean dryer vent can help prevent other fire hazards, such as overheating or electrical issues caused by restricted airflow. This can give you peace of mind and allow you to use your dryer with confidence.
2. Improves Dryer Efficiency
A clean dryer vent can significantly improve your dryer’s efficiency by allowing hot, moist air to escape more easily. When the vent is clogged, your dryer has to work harder and longer to dry clothes, consuming more energy and increasing wear and tear on the machine. By maintaining a clean vent, you can reduce drying times, save on utility bills, and extend the life of your appliance.
Additionally, improved efficiency can help prevent other issues, such as damp clothes, musty odors, or overheating. This can make your laundry routine more convenient, cost-effective, and enjoyable.
3. Extends the Life of Your Dryer
Regularly cleaning your dryer vent can help extend the life of your appliance by reducing the strain on its components. When the vent is clogged, the dryer has to work harder to push air through, causing unnecessary wear and tear on the motor, heating element, and other parts. By maintaining a clean vent, you can help your dryer run more smoothly and last longer.
Additionally, a clean dryer vent can help prevent other issues, such as overheating, electrical problems, or mechanical failures. This can save you money on repairs or replacements and ensure your dryer serves you well for years to come.
4. Saves Money on Energy Bills
A clogged dryer vent can cause your dryer to use more energy to dry clothes, leading to higher utility bills. By cleaning your vent regularly, you can improve your dryer’s efficiency and reduce its energy consumption, saving you money in the long run. According to the U.S. Department of Energy, a clean dryer vent can reduce drying times by up to 20%, resulting in significant energy savings over time.
Additionally, consider other energy-saving tips for your dryer, such as using it during off-peak hours, cleaning the lint trap after every load, and avoiding overloading the machine. These small steps can add up to big savings on your energy bills.
5. Enhances Indoor Air Quality
A clogged dryer vent can lead to poor indoor air quality by trapping moisture, lint, and other contaminants in your home. This can cause musty odors, increase humidity levels, and even contribute to mold growth. By cleaning your dryer vent regularly, you can improve airflow, reduce moisture buildup, and enhance the overall air quality in your home.
Additionally, a clean dryer vent can help prevent allergens, dust, and other particles from circulating in your home. This can be especially beneficial for those with allergies, asthma, or other respiratory issues, as well as for maintaining a healthier, more comfortable living environment.
Conclusion
Cleaning your dryer vent using vacuum attachments is a simple yet essential task for maintaining the safety, efficiency, and longevity of your appliance. By understanding the key tools, techniques, and tips for cleaning, as well as avoiding common mistakes, you can keep your dryer running smoothly and safely for years to come. Whether you’re a homeowner, a renter, or a laundry enthusiast, regular dryer vent cleaning can help you avoid potential hazards, save money on energy bills, and enjoy a more efficient and reliable laundry routine.
Remember, the best way to clean your dryer vent is to be thorough, consistent, and safe. Take your time, use the right tools, and don’t hesitate to call in a professional if you’re unsure or uncomfortable with the process. With the right approach, your dryer vent can become a well-maintained and essential part of your home’s safety and efficiency.
Have you cleaned your dryer vent recently? Share your tips, favorite tools, or experiences in the comments below! If you found this article helpful, don’t forget to share it with your fellow homeowners. Here’s to a safer, more efficient, and more enjoyable laundry routine!
FAQs
What is dryer vent cleaning?
Dryer vent cleaning is the process of removing lint, dust, and debris from the vent system of your dryer to improve airflow, efficiency, and safety. It involves cleaning the vent hose, the dryer’s vent opening, and the exterior vent to prevent clogs and reduce the risk of fire.
How do I clean my dryer vent using vacuum attachments?
Unplug the dryer, locate the dryer vent, remove the vent hose, vacuum the vent and hose using crevice, hose, or brush attachments, clean the exterior vent, and reconnect and test the dryer to ensure it’s working properly. Use gentle, controlled motions to avoid damaging the vent or hose.
What are the common mistakes to avoid when cleaning dryer vents?
Avoid skipping the unplugging step, not cleaning the entire vent system, using the wrong attachments, forgetting to clean the lint trap, and ignoring the exterior vent. Addressing these issues can help you clean your dryer vent safely and effectively.
How often should I clean my dryer vent?
Clean your dryer vent at least once a year, or more frequently if you notice signs of reduced airflow, longer drying times, or a hot dryer. Additionally, clean the lint trap after every load of laundry to prevent lint buildup and improve efficiency.
What are the benefits of cleaning my dryer vent?
Cleaning your dryer vent reduces the risk of fire, improves dryer efficiency, extends the life of your dryer, saves money on energy bills, and enhances indoor air quality. It can help you maintain a safer, more efficient, and more enjoyable laundry routine.